Tuesday, August 7, 2012

Classroom Economy (with printables!)

I've been in my classroom each day this week - pretty soon I'll have some pictures to share with you!

In the meantime, I know I've been alluding to the classroom economy system I want to implement this year, so I'm finally getting around to posting about it! (Stay tuned at the end for some freebies!)

I'd seen various formats for classroom economies posted on the internet and around pinterest, so I combined  a lot of the ideas I liked into my own classroom economy system!


(I haven't tried implementing this yet, so all of this thinking is how I *hope* it will run!!)

COMPONENT ONE: CLASSROOM JOBS AND RESPONSIBILITIES

First step will be showing the list of jobs and responsibilities and explaining each one, so that the students will have an idea of the jobs that exist, and what will be required.  I am a strong believer in every student having a job for which they are responsible in the classroom.
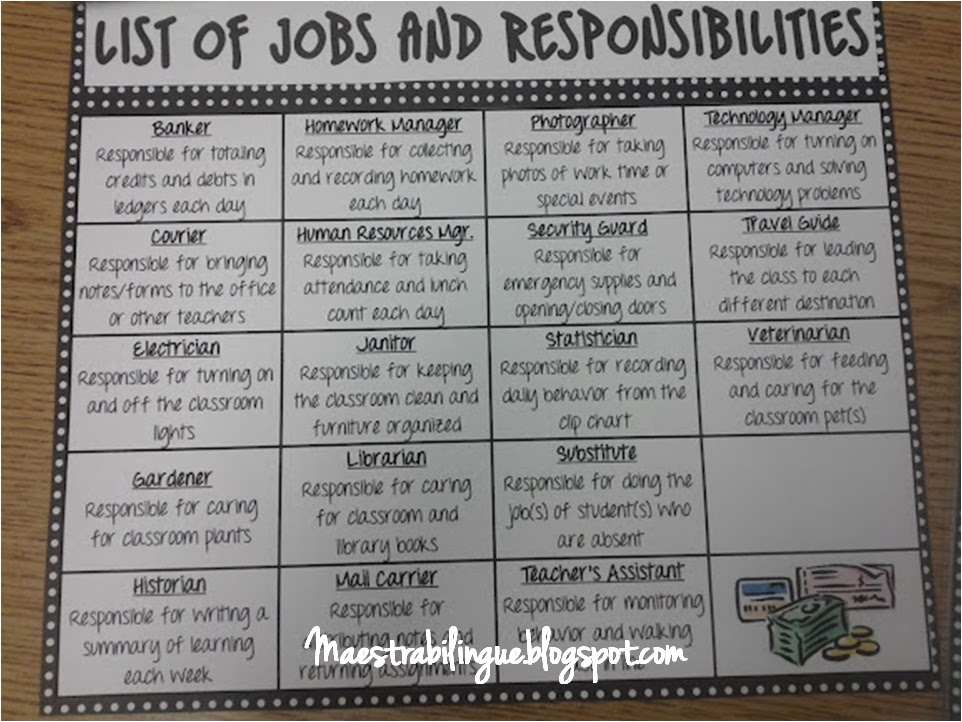
After that, students will complete a job application for their first, second, and third choice jobs.

I'll collect the job applications, and assign jobs. Students will be responsible for knowing when and how to perform their jobs, and how much "pay" they earn each day.

COMPONENT TWO: ECONOMY AND "PAY" SYSTEM

Students will receive "earnings" each day based on 3 categories: behavior, classroom job performance, and homework completion.
Behavior: I have integrated the clip chart system with this economy structure - students gain/lose earnings based on the color where they finish their day.  For more about the clip chart system, see here.  
Classroom job performance: each job receives a specific amount of "pay" each day.  If students complete their jobs, they earn their wages.  If not, then they do not earn their wages.  I'm hoping this will help motivate the students and keep them accountable for performing their jobs!
Homework completion: If students complete their homework, they earn $1 per assignment.  If they don't, they lose $1 per assignment.

Students will keep track of their monetary earnings in a personal ledger:

At the end of each day, they will total up their earnings and/or losses with a "banker" (one of the classroom jobs).  At the end of the week they will "pay rent" for their property (desk and chair) and have the opportunity to spend their earnings. (I've tried to make sure that even the lowest-paying jobs, combined with good behavior and homework habits, will allow students to have AT LEAST enough to pay rent and to start saving up for some of the rewards!! - hopefully this will hold true, otherwise I may have to adjust a bit!)  If students don't have enough money to pay rent, they can borrow a loan from the bank:
I printed some of these out and laminated them. :)

As students save up money, they can purchase privileges, or they can purchase property!
I already have to change this a bit, as I've learned my school has a strict no-food-in-the-classroom policy.  No candy option for me anymore! :)

I've tried to make the rewards enticing enough that hopefully they will want to save up to get the good ones, and hopefully it won't take too long or happen too frequently!

Or, as an alternative, students can opt to purchase their property (desk and chair) AND/OR others' property!

For example, if Sally purchases her own property, she will no longer have to pay rent.  If Sally purchases Billy's property, then Billy has to pay his rent to Sally!  Depending on how this idea goes over, I may have to instate a rule that if you can afford to buy your own property, you get dibs on it...or something like that, just so there aren't too many arguments and/or tyrant property owners! :)

WHEW! I think that's everything! Now for some FREEBIES!! :D I've included some of the above documents, in case this classroom economy system appeals to you!

I'd love to hear if any of you choose to implement this in your classrooms, and how it goes! :)

Saturday, August 4, 2012

August currently.... and a NEW feature (SIOP Saturdays!)

Thunderstorms are just starting here... I've got my bucket and towels in place (because no, bloggers, repair man has not returned to fix my ceiling yet) but so far so good and no leaks yet! (Knock on wood!)

Here's my August currently:


Also, bloggy friends, I want to introduce a new feature to my blog: SIOP Saturdays!


Background: I just completed a 3-day training in my school district about using the SIOP model for instruction.  I also took a class about it a few years ago as part of my path toward my bilingual and ESL endorsements.  I think it is such a fantastic method for teachers to use, not only for ELL students, but for ANY students!  So I decided that once a week, on Saturdays (because then my teaching week will be over, and also because SIOP and Saturday both start with S, so it makes sense!) I will highlight a feature of the SIOP model, and list a few examples of strategies that teachers can implement in their classrooms to address each feature!

Disclaimer: Let it be known, these are all MY opinions.  I am neither being told to, nor receiving any form of compensation for, explaining SIOP.  The book Making Content Comprehensible for English Learners: The SIOP Model is written by Jana Echevarria, MaryEllen Vogt, and Deborah J. Short, and copyright by Pearson Education, Inc.  Hopefully that's everything I need to include to make sure proper credit is presented where it is due. :)

Today's Feature: Overview of SIOP

I'm curious...how many teachers who are not Bilingual/ESL teachers already know what SIOP stands for, or use any of the features in their classrooms?  I know I had never heard of it before I began pursuing my bilingual/ESL endorsements.

SIOP stands for Sheltered Instruction Observation Protocol.  What is it?  It is an empirically validated model of sheltered instruction.  (Those of you unfamiliar with sheltered instruction, that term means that the teacher adapts instruction in order to make the material more easily learned.  The same typical curricular standards are being addressed, but the manner of addressing them may vary based on student language skills).  In simple words, SIOP provides a framework for teachers to use in lesson planning and delivery in order to be more mindful about WHAT they are teaching and HOW the students will learn the material and practice language skills.

There are 30 specific features of the SIOP model, and these features are grouped into 8 main components:

Lesson Preparation
Building Background
Comprehensible Input
Strategies
Interaction
Practice/Application
Lesson Delivery
Review/Assessment

My goal for this series is to address one of these components each Saturday, highlight the features that are specific to each component, and show some examples of strategies (when applicable) that can be integrated into classroom instruction to promote student engagement and student success.  I hope you will join me through this series!  Next week I'll start with Lesson Preparation! :)

(Also, through the typing of this post, the rain came and went, and brought old leaks and new.  Ceiling leaked again (but this time just through the hole he made, so I guess that was a good call on his part!) and also the frame above my patio door.  Sad face again.)

Thursday, August 2, 2012

Classroom sneak peek!

Ohhhhh friends... I am so happy!

I had a last-minute opportunity offered to me to attend a SIOP workshop in my district over three days (yesterday, today, and tomorrow) that is actually being hosted at my school building... so I've had the chance to meet teachers from my school and the other schools in the district, which has been amazing!! Everyone has been so kind and welcoming to me, and I am SO super excited (even more than I was before!) to be where I am this year.

Today I also had the chance to get...the keys to my new classroom!!!  And I got to go in, and took some pictures, and am anxious to start thinking about how to arrange everything.  The teacher who had the room before me retired, so she left lots and lots of materials and resources... which is good because I'm sure much of it will be useful, but a little bit distressing because it just means I have THAT MUCH more stuff to go through and organize.  But I still have lots of time to do it!  So here is the "before" picture of my classroom - be not deceived, it may look like it's up and ready to go, but I haven't brought ANY of my things into the room yet, and I haven't done ANY decorating of my own!!


I'll keep you updated on my progress!! :)

Tuesday, July 31, 2012

It's 4 a.m. Do you know where your ceiling is leaking?

That's right, bloggers... We had some thunderstorms that passed through about an hour ago (and I DO NOT like thunderstorms) that woke me up, and I kept hearing something that at first sounded like hail outside (which is quite possible).

So I got up and went to look out my living room deck doors...and felt something drip on my neck... and then saw that yes indeed, there was water dripping from my ceiling.  Went into panic mode, grabbed towels and my trusty bucket, and put it under the hole.

**SIDE NOTE** I'm no stranger to water mysteriously leaking into my living room.  At my previous apartment, any time that it rained, or snow melted, my AC unit would drip...no, often cascade... water into my living room.  FINALLY convinced that management to fix it one chilly February morning - which involved removing the whole AC unit, chipping away some of the brick from the building (because it had been installed with the incline draining INTO my apartment rather than down and AWAY from it) and then didn't have any more problems with it.

But anyway, back to my current leak.  Walked away from it for a moment, turned on some lights, and looked again...and noticed that a steady stream of drips was proceeding from a little hole.

This confused me, because the hole was not right next to the outside wall, it was a little further in...and I do not live on the top floor of my apartment building.  There is someone else's unit right above me.  How on earth could it possibly be dripping from where it was?

Went into panic mode x2, texted my mother, who actually called me right back (must have woken her up with my text, sorry mom...), eventually called the emergency line for my apartment complex, got told by an operator that they would contact the repair man, went back to look at the hole...

...and realized that that little hole was the least of my worries.  At least a foot by a foot patch of my ceiling was looking a little, well, bubbled out.  Touched it (where did that bravery come from?!) and it was soft...

Cue panic mode x3.  Waited in a nervous frenzy, repair man finally arrived (but no advance phone call, so that was a fun wait), strolled over to the ceiling, took some little tool and poked my ceiling, and caused a steadier stream to start flowing into a bigger bucket that he brought.

It actually JUST stopped it's steady flow, and he left like 10 minutes ago.  Blahhhhh.

So anyway, he will be back a little later, and I'm here, awake, babysitting the bucket, making sure Libby kitty doesn't get into mischief, and because I'm afraid to go back to sleep for fear of discovering more trouble.  So I leave you with this beautiful picture:


Monday, July 30, 2012

Monday made-it!

I'm linking up today with Tara from 4th Grade Frolics for her weekly Monday made-it!
This week I worked on my classroom rules display. I was inspired by a pin I found on pinterest of a teacher who had hung her rules vertically on ribbon, and was intrigued! I thought it would match my clip chart if I made mine in a similar fashion, so this is what I came up with! :)

Here's what the whole thing looks like.


And here are some close-ups.

And here are the files for my signs if they strike your fancy as well!  I printed them out on white cardstock, and then glued them to blue cardstock and laminated them.  Then I hot-glued them to the ribbon.  I love how they turned out!!

Another element of my Monday made-it is my new blog header and my new blog button!  I'm so excited with how they turned out, and think they look a lot more polished than my previous ones.  Hooray!

And FINALLY my most exciting Monday made-it item of all... a dress!!  I asked for a sewing machine for Christmas this past year from my parents, and have just finally started using it with a passion.  My mom has incredible sewing skills - she made just about all of my sisters' and my Halloween costumes growing up, and she made all of my homecoming and prom dresses.  I'd been hoping that I inherited some of her talent!  I finally found some really easy tutorials online of how to make some dresses without needing to use any patterns (basically just sewing the fabric to the top of a tank-top) and finally took the plunge and am so proud of how this dress turned out!! 

This is actually my second dress - the first one I made with a different fabric and a shorter length.

I knocked it out in a day - something around 9 hours altogether, with sizeable breaks between working on each part.  And I also added something that the online tutorial didn't call for - lining, since the bottom fabric is a really light color.  And I finished it!  I even wore it the next day to my friend's bridal shower, and got some compliments on it!  I can't wait to attempt other dresses and skirts - this was a huge confidence boost for me and my growing skills! :D

I'm hoping to be able to get into my classroom sometime this week to start the unpacking/decorating process, so cross your fingers for me, and stay tuned! 


Wednesday, July 25, 2012

Cranium club - with printables!

So I want to share with you today the idea that I discovered earlier this spring that has made me SO EXCITED to be moving to an upper elementary grade!! (Though I'm sure you younger-grade teachers can find a way to adapt this to your learners if you so choose!)  It's an idea called Cranium Club, or Mastery Club, or any other variation, depending on how the teacher decides to name it!

I stumbled across a few different versions on pinterest, including a version by Mrs. Renz and a version by Leslie at Jack of all Trades (and just now happened to stumble across a version by Amanda at Teaching Maddeness), and completely fell in love with the concept.  It's a standing answer to the "what can I do, I'm all finished?" question from those fast-finishers, which is something I'm always looking to find!

I was also drawn to this idea because it reminds me quite a bit of a similar ploy used by my 7th grade pre-algebra teacher.  She had special puzzles called "quizzles" that she offered for us to do...probably for extra credit or the like.  I just remember that she told me at the end of the year that I was the only student who completed all 50 of them! :)

Back to Cranium Club though...basically in a nutshell, students have a list of "challenges" that they can choose to complete - participation is entirely optional.  Students can choose any of the challenges to work on, in any order, and can do so on their own time - at home, recess, or if they finish work early.  They have to memorize their answer to the challenge (with the exception of a few challenges that require special recording sheets) and can give their answer to the teacher before or after school, during recess, or any other free moment during the day, at the teacher's discretion.

With my version, I decided to expand it to 100 questions instead of 80-odd questions.  100 just seems like a  more finished number, in my opinion!  In my version, if students complete 15 challenges, they become a Cranium Club member, and get to have their name added to the "Hall of Fame".  Completing 25 challenges earns them "silver member" status, and 50 complete challenges earns them "gold member" status, which I will mark by their name with stickers of that color.

Here are a few pictures of what I am using to implement it and keep track of student participation:

These were printed on cardstock and laminated - I'll display these on a cabinet or wall (I wish I knew what my classroom layout looks like!!).  One page lists the rules, then there are 5 pages with challenges divided by subject category, one title sign, and my hall of fame (super stars) sign


My cranium club materials share a binder with my classroom economy (which I will post about soon).  The first page I have is a list of all the challenges - same as on the posters, just condensed to one page!  I will copy this page and give it to my students so they have a reference of the challenges available to them.

Following the list of challenges, I have pages where I will mark which challenges each student has completed.


For some of the challenges, I created cheat-sheets with the answers (or a variety of possible answers, for more open-ended questions).  I keep these answers in the binder too in case I need a reference!

I'm taking my next big blogging step, and learning tonight how to link files directly to my site so that any of you who are interested can download them!  With this post, I'm attaching my page that has the rules, as well as a list of the 100 challenges that I have decided to incorporate.  They are based off challenges I saw used for a 4th grade class.  As I mentioned, I added a few extra to make it an even 100, and I also had to tweak them (changing some of the state-specific challenges, and I also changed one of the counting languages to Chinese instead of Spanish (because that would be way too easy for my kids!)

So...here ya go! Enjoy! (Please please please let the links work!!)

Since this is a new idea to me, I obviously haven't implemented it in a classroom yet!  Do any of you have experience with a similar "club" in your classroom?

Monday, July 23, 2012

My teacher story - linky party!

We all come to the classroom with a story. Some are similar to others while some are very distinctive. What's YOUR teacher story? How did you get to the classroom? Has it always been a lifelong dream or did you come after being in another profession?

My teacher story is pretty straightforward, but how I got into bilingual education is an interesting path.

I always knew I wanted to be a teacher, ever since I was really young.  I loved all the teachers I had year after year, and knew that I wanted to follow in their footsteps.  I worked in a daycare as an afternoon/summer job in high school, and declared my education major as soon as I started college.  Well...I guess there was like ONE week in High School where I considered going into psychology (because I found that class fascinating) but even just IMAGINING not going into teaching left me with an unsettling feeling inside, so I quickly nixed that idea. :)

My journey toward becoming a bilingual/ESL teacher, however, is a little more interesting - mostly because it seemed that I tried resisting it every step of the way.  But for that story, I have to start with why I wanted to learn Spanish in the first place.  Growing up, my best friend's family spoke Spanish.  She didn't speak it much, but the idea of learning another language fascinated me.  I decided that when I had the chance, I wanted to learn Spanish, so that I could understand what her parents were saying.  My first opportunity came in 8th grade - I loved the class, so I took every possible Spanish class that I could during high school (which even included sacrificing a semester of band to do so!).  

Entering college, I decided that I wanted to at least maintain what Spanish I had already learned, and decided that I could probably pursue a minor in Spanish (because my first love was education).  However, during my sophomore year, I chose to take a Spanish course called Spanish for Service Professionals, which was a more personalized class of how you could use Spanish within your given major.  It was a difficult class, but very enjoyable - I told myself that if I survived that class, and thrived in it, I would consider changing from a Spanish minor to a double major with Spanish and education.  So, that happened, and I adjusted my course path to include more Spanish along the way.

That same semester, I took an education course which linked my class up with 5th grade pen-pals from a nearby inner-city school.  I learned that my penpal was in a "bilingual" class (which I look back on today and realize it is more ESL than bilingual) and was fascinated by the idea.  I got permission from my professor to go visit the school for a day, to see how that classroom looked, and I was intrigued.

Fast forward to senior year and student teaching - I made the decision to pursue a bilingual teaching placement, and landed in a "bilingual" kindergarten classroom (again, I put that in quotes, because while the students all were native Spanish speakers, this school was not teaching them first in their native language, it was only expecting them to learn to read and write in English.  Yet the school still called it bilingual...).  I loved the experience.  

So when I started sending out applications, I didn't discount any bilingual opportunities.  I wasn't necessarily seeking out only bilingual opportunities, but I didn't want to snub my nose at any offers!  And the offer that I eventually accepted happened to be for a bilingual second-grade classroom.  Taught bilingual second grade for two years, and then bilingual first grade for one.  I also took all the required classes to earn both my bilingual and ESL endorsements.  This year I made the decision to move to a different district, and accepted an offer to teach Bilingual/ESL 4th grade (how it exactly will end up being, I'm told will be based on the needs of the students.  Which makes perfect sense to me). 

While I love Spanish, I am actually really excited for the opportunity to actually teach in English this year, while still using my Spanish to keep it from getting rusty!  It can be exhausting, though, trying to remember all the vocabulary for teaching each concept in your non-native language, not to mention having to find alternate ways to explain concepts when your vocabulary is limited.  I am in the unique position to know EXACTLY how my students can feel at times, when trying to master a new language, and I cannot wait to see what this year will bring. :D